Thursday, September 3, 2009

Blender_3D-_Noob_to_Pro_-_Miscellaneous_Tutorials

This tutorial will guide you through the process of making 3D tiling background for use with web pages, your desktop, or any thing else for that matter. You will get to see the use of Blender and graphic editing such as Adobe Photoshop or GIMP. The tutorial will provide detailed explanation to cator to beginners.


To get the entire Tutorial Download the PDF ( Click Here To Download )

Blender_3D-_Noob_to_Pro_-_Advanced_Tutorials


This tutorial is meant to stop all the RVK (Relative Vertex Keys) question. One of the blender's powerful features is its Python API. This allow you to interface with Bleder through python programming language.Blender is not just useful to create complete animation, but it also a great modeler. In this tutorial you will learn to write a simple Python export Script for Blender. Without requiring Previous Python knowledge.

To get the entire Tutorial Download the PDF ( Click Here To Download )

Blender- tutorial 2

If you are reading this tutorial, you are probably feeling like I did exactly one year ago. I had found this extremely interesting looking 3D application (which other users were raving about), but the user interface completely baffled me. I couldn't find the quit function (I had to kill the application instead of exiting it), I saw buttons that seemed to react differently each time I clicked on them and every time something interesting happened, I could not reproduce
it.
In the weeks after that, I slowly found out the basic principles behind the Blender user interface. And though it is non-standard, it became clear that it was a very consistent system - it would let me use the same functions in a number of completely different situations.


To get the entire Tutorial Download the PDF ( Click Here To Download )

Blender- tutorial

Well, it's free, fast and stable. It can also be used for very complex models – it's much more suitable than GMax for example when working with large and highly detailed models – and it includes everything you might need to make mapping and texturing easier in one package. It can render and also 'bake' the results into the texture which means that highlights and shadows can be automatically generated, saving hours of work.

This tutorial will attempt to guide you through the steps necessary to create your own 3D models which can be used in the Trainz Railway Simulator or any other program for which
you can find an exporter.


To get the entire Tutorial Download the PDF ( Click Here To Download )

Blender-Tutorial-Guide

This text will provide a guide through the many Blender tutorials which should familiarize you with many modeling and some animation techniques in a quick way, without having to go through useless or repetitive tutorials. Furthermore, in addition you will have some small corrections to unclear tutorials.

To get the entire Tutorial Download the PDF ( Click Here To Download )

Blender GoogleEarth Tests

The following describes objects as rendered in the Blender 3D View port or Render engine and how those objects appear when displayed in the Google Earth Application.

To get the entire Tutorial Download the PDF ( Click Here To Download )

DeciduousTrees

In general, modeling trees is a long and somewhat tedious undertaking. Usually, each tree contains thousands of individual elements. In many instances, trees are included in a model as an accent to the main focus adding a sense of atmosphere rather than being the main focus of the completed model itself. For this reason, many 3D software products include some sort of “procedural” modeling method of generating trees which eases the task of tree modeling. There are indeed a number of Blender python scripts available on the web that attempt to do this as well as many tree modeling applications whose exported files can be imported into Blender.

In this tutorial we will model a deciduous (leaf bearing) tree with an eye toward keeping the model as low in polygon face count as possible and maintaining as much modeling flexibility as possible, so that the completed model can be re-fashioned into other types of deciduous trees with a minimum of effort.


To get the entire Tutorial Download the PDF ( Click Here To Download )

Box Modeling Frog

In this tutorial, we will use common box modeling techniques to model a frog.It's very easy to model.

To get the entire Tutorial Download the PDF ( Click Here To Download )

TempleOfKukulkan_BlenderToGoogleEarth

In this tutorial we will examine the process of placing a Blender model into the Google Earth application. Google Earth provides satellite imagery depicting the entire earth and allows users to insert three-dimensional objects at specific latitudinal and longitudinal locations.


To get the entire Tutorial Download the PDF ( Click Here To Download )

Blender_3D-_Noob_to_Pro_-_Beginner_Tutorials

This is one of the most powerful 3D animation and creation tool out there. In this tutorial you will find yourself running into cryptic codes quite often. These codes refer to the keys you need to press on the keyboard and buttons on the mouse you need to press. They are pretty standard through out the Blender community.

To get the entire Tutorial Download the PDF ( Click Here To Download )

Modeling Vase


This tutorial shows how to create model of a Vase, in a different way (excluding Lathe function). It's very interesting and very easy to follow.

To get the entire Tutorial Download the PDF ( Click Here To Download )

TigerLily


Learn how to create Tiger Lily step by step in blender 3D. The process of modeling is very easy and less time consuming.

To get the entire Tutorial Download the PDF ( Click Here To Download )

First Animated Model – Yellow Submarine

Most of you are perhaps too young to remember the Beatles song “Yellow Submarine”. In this tutorial you will create a simple animated model of a yellow submarine.

To get the entire Tutorial Download the PDF ( Click Here To Download )

The Art Of XSI

In this tutorial you will find three types of . 1 Modeling Grasshopper, 2. Modeling a woman head, 3. Designing a room.You will find this as a complete tutorial for XSI modeling.


To get the entire Tutorial Download the PDF ( Click Here To Download )

Trainz Railway Simulator

Well, it's free, fast and stable. It can also be used for very complex models – it's much more suitable than GMax for example when working with large and highly detailed models – and it includes everything you might need to make mapping and texturing easier in onepackage. It can render and also 'bake' the results into the texture which means that highlights and shadows can be automatically generated, saving hours of work.

This tutorial will attempt to guide you through the steps necessary to create your own 3D models which can be used in the Trainz Railway Simulator or any other program for which you can find an exporter.

To get the entire Tutorial Download the PDF ( Click Here To Download )

Tuesday, September 1, 2009

Create Eyeball in ZBrush


In this short tutorial you will be explained how to create an "eyeball" in ZBrush then paint onto its surface using the symmetrical mode. The final eyeball can be saved as a .ZTL (native ZBrush object) or you can export the eye texture and use it in any other 3D application.

To get the entire Tutorial Download the PDF ( Click Here To Download )

Modeling

To get the entire Tutorial Download the PDF ( Click Here To Download )

Photoshop_Techniques_for_Visualization


Some Practical Solutions:
Pasting one object behind another, adding a 3D sitemap into an aerial scene, and duplicating
objects in a very specific area.
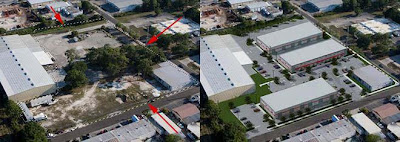
First, using a selection tool, select the area you wish to have another object occupy. In this instance, we will use the site area of this business park (See Figure 1-1). Then, copy the other object. Finally, from the menu bar, click Edit �� Paste Into. A layer mask is created
automatically, and as you can see in Figure 1-2, the 3D sitemap now occupies the space that you
selected. No matter where you move the new layer, it can not leave the confines of the selection
set used to create the layer mask.
Additional Tips:
When creating your selection, use the “Feather” feature found in the Options Bar. It helps make
the outer area of the copied object fade into the scene.

To get the entire Tutorial Download the PDF ( Click Here To Download )

Cactus Tutorial


This tutorial is to illustrate how you can get far along in the modeling process with just a few simple adjustments of an object’s geometry properties. This example is applied to ZSphere models, but the techniques can also be used with primitive objects.

To get the entire Tutorial Download the PDF ( Click Here To Download )

Basic Shape with ZSpheres


In this tutorial you will learn how to create model in ZBrush and apply material effects with the help of 3dsMax.

To get the entire Tutorial Download the PDF( Click Here To Download )

Setting Up the Tutorial

For a long time, people have wondered how to cut holes through objects in ZBrush. Thanks to the retopology features in ZBrush 3, this is actually very easy to do. Yes, this ZBrush feature is a great way to create new topology over top of an existing model. But once you've learned the simple techniques in this tutorial you will also be able to use ZBrush 3 to change the polygons of your existing models. You don't even have to lose sculpting that you've already done!


To get the entire Tutorial Download the PDF ( Click Here To Download )


Creating New Topology

This topology is composed of multiple Z Sphere chains, and was generated from the topology you will select.. These chains of Z Spheres defines the contour of patches, from which a 3d mesh is going to be generated.

To get the entire Tutorial Download the PDF ( Click Here To Download )

FIBER BRUSH SETTINGS


Get yourself a model that needs some hair. Render him out using BEST RENDER in the RENDER panel with whatever light/material/shadow settings you need for your scene. Once the scene is rendered go to the LAYERS panel and hit the BAKE button.

To get the entire Tutorial Download the PDF ( Click Here To Download )

Grass Material


For this grass tutorial you should have a general knowledge of
3D Studio MAX.

In the bottom of the tutorial their is a glossary, where the buttons mentioned in the tutorial, is listed in alphabetic order.These is one of the best and easiest way to create Grass in 3ds Max.


To get the entire Tutorial Download the PDF ( Click Here To Download )

MODELLING THE HEAD OF BEAST


To me, Pixologics Zbrush lives in a world somewhere between 2D and 3D never really knowing which camp to lie in. With it I can create 3D meshes that can be textured and have native materials added to them. Zbrush uses a technology called `Pixols` that sees each pixel as a 3D image that retains width, height and, more importantly, depth information. Once you `snapshot` a model (or Ztool) into an image you can still add depth with a number of brushes, change the model's material and even adjust the lighting. In this tutorial I will attempt to walk you through the creation of a detailed head study (called `EFXterminator`). The steps will lead you through modeling the head from a basic 3D sphere, adding color and material to the model then creating and adding textured eyeballs.


To get the entire Tutorial Download the PDF ( Click Here To Download )

In this tutorial we will look at sculpting a skull using image planes

In this tutorial we will look at sculpting a skull using image planes. We will use:

  • Sub Tools
  • Transparency
  • Masks
  • 3D sculpting brushes
This is only the basics of ZBrush.You will learn how to sculp a scull in easiest way.


To get the entire Tutorial Download the PDF ( Click Here To Download )

Nurb Modeling


This tutorial demonstrates my favorite techniques for symmetric NURB modeling and 3D sketching, enough to build the model, similar to what you see in the first pictures. I realize that the model you see at the pictures is not suited for very advanced animation, which could require different topology and more refinement.The NURB (Non-Rational Mesh Smooth) or Subdivision Surface technique uses low-polygonal mesh to control the shape of the smooth surface.

To get the entire Tutorial Download the PDF ( Click Here To Download )

Mental ray: Caustics

Caustics are the term or the light patterns caused by light refracting through a glass object. For example, take a clear glass of water and set it out in the sunlight. The bright streaks and patterns you see are caustics.Beginning with 3ds Max , the mental ray renderer is integrated with the program. Unlike the default scan line rendered, mental ray can calculate photos to create Global Illumination (GI) and caustics lighting.


To get the entire Tutorial Download the PDF ( Click Here To Download )


This tutorial is designed to be an introduction to 3d sculpting in ZBrush


This tutorial is designed to be an introduction to 3d sculpting in ZBrush, and will only be focusing the most basic and essential sculpting tools and functions.First of all, any time you will be sculpting, it is always a good idea to have a detailed reference image available (you can usually find everything you need off the internet).

To get the entire Tutorial Download the PDF ( Click Here To Download )

Monday, August 31, 2009

Antiliasing side effect


In the 3d world, render engine use a process known as super sampling to improve the quality of rendered output by decreasing the effect of aliasing. aliasing is a term to describe imperfections in the rendering process caused by color changes that are too drastic and that occur over too small of an area of screen space to be adequately depicted by the pixels that define the space. In a single still image, aliasing is certainly noticeable and can reduce realism, but if the same scene is set in motion, the results can be downright distracting and can ruin, what would otherwise be a great animation.

For more details and to learn how to work on it,

Please click Download the entire PDF ( Click Here To Download )

Wine Carafe and Glasses

In this tutorial, you will use Raytrace materials, Raytrace maps, and Thin Wall Refraction maps, combined with Opacity maps, to create a decorative wine carafe and glasses on a living room table.Raytracing is a technique for generating highlights, reflections, and shadows by tracing the path of rays sampled from a light source. Raytraced renderings are more accurate and look more photo realistic than other rendering methods, but generally prolong rendering times. The Raytrace Material and Map features in 3DS MAX R2 permit selective raytracing. For example, you can limit the raytrace to specific objects, sub-objects, or sub-object selections. Furthermore, you can control which objects are reflected and refracted, and how they are reflected and refracted.

To get the entire Tutorial Download the PDF ( Click Here To Download )

Creating Background For 3D Scene


Backgrounds are critical part of just about every type of 3D scene. Although they are relatively simple element to add to a scene, background can just as easily be a source of frustration and problems for 3ds Max users. There are two types of backgrounds-those created with geometry
and those created by use of the environment map channel. Both have advantages and disadvantages over the other and both can be broken into several subcategories.

To get the entire Tutorial Download the PDF ( Click Here To Download )

Biped Setup


This tutorial is geared toward beginner and intermediate users of Studio Max and Character Studio.Keep in mind that there is no “perfect” way of doing this. What I am about to show you is simply one of many ways to get the same result. Once you go through this tutorial, I suggest you experiment with various techniques and find out what works best for you. Take your time and learn as you go. Be prepared to rework areas over and over until you get the desired result. In most cases, you may not see errors in your mesh until you’re on your final step, or well into the animation process.

To get the entire Tutorial Download the PDF ( Click Here To Download )

Studio Lighting Tutorial


In this tutorial, you will see how to setup a studio lighting rig that was used mainly for vehicle rendering.Basic to intermediate knowledge of 3DS Max is needed for this tutorial.This process will take about 10-30 minutes, depending on your particular skill level.

To get the entire Tutorial Download the PDF ( Click Here To Download )

Fireplace Tutorial


In this tutorial you will create Multi/Sub-Object materials, and fog and combustion atmospheric effects, and apply them to a fireplace. The fireplace has two different types of brick (yellow interior firebrick and red exterior brick), a layer of soot on the yellow brick, burning logs with their own layers of soot, and multiple combustion objects to create flame effects.

Lesson 1: Setting Up Two UVW Mapping Channels
Lesson 2: Creating Multi/Sub-Object Materials for the Fireplace
Lesson 3: Adding Materials and Soot to the Fireplace Logs
Lesson 4: Adding Combustion
Lesson 5: Adding Firelight Forrest

To get the entire Tutorial Download the PDF ( Click Here To Download )

Visualisation Insider


Building block of any architectural scene is line work and the vast majority of architectural visualization projects begin with AutoCAD drawing. Knowing how to use the line work in these drawing is a critical factor in fast, efficient work in 3ds Max.This article describes the process of cleaning AutoCAD drawings and preparing line work for importation in 3ds Max and how doing so properlycan allow the user to turn the line work into 3D in the shortest amount of time possible.

To get the entire Tutorial Download the PDF ( Click Here To Download )

Creating site plans-Part 3


In this tutorial PART 3, you will learn to apply Standard Material from Library, simulate global illumination with a few standard lights and merge the camera path used in final animation of this project.After that you will learn how quickly you can apply VRay Render engine to this scene to generate true global illumination and some procedures for creating 3D terrain.

To get the entire Tutorial Download the PDF ( Click Here To Download )

Create site plans-part 2

In this tutorial PART 2 , you will learn how to create Road Lines, Paver Banding, Mulch, Bodies of Water, Parking Stops, Vegetation, Trees, Plants, Light Poles,Cars, Fountain and Buildings.

To get the entire Tutorial Download the PDF ( Click Here To Download )

Creating 3D site plans-part1

In this tutorial, you will get as many tips, tricks and routines as possible, spending minimal time on repetitive steps that waste of time without teaching anything new.The site plan used in this tutorial may appear overly simplified.


To get the entire Tutorial Download the PDF ( Click Here To Download )

Wednesday, August 12, 2009

Cinema 4D Basic Exercise

Cinema 4D is created to assist the beginners to intermediate users, the author uses a unique training method that bring a high degree of visual clarity to even the most complex applications.A self-paced learning interface that simplifies learning and breaks even the most complex topics down into easy to follow step-by-step instructions making it ideal for users of all levels.

To get the entire Tutorial Download the PDF ( Click Here To Download )

Cinema 4D Animation


Here in Cinema 4D you will get lots of 4D interesting animation tutorial,
through which you will able be to create animation.
This is one of the best animation software I have used and i sense that
everyone who read this tutorial will be able to handle it in easiest way.

To get the entire Tutorial Download the PDF ( Click Here To Download )

Basic Cinema 4D Abstraction

Cinema4d is a great 3-D modeling program. We have many Modeling Techniques that we have
shared with you. There are several levels of difficulty, which means everyone can and will learn
something new.
People will find that this tutorial is easier to follow than actually getting Cinema 4D themselves.

To get the entire Tutorial Download the PDF ( Click Here To Download )

Cinema 4D Basic Tutorial

3D graphics, is commonly divided into four parts:
Modelling is the creation of 3D objects. Models are the building blocks that are used to create
3D scenes.
Scene building is where you put the models together. It also is where you give them textures
and physical properties, and add lighting and atmospheric effects.
Animation is scene building with the added element of time. It enables you to move objects
and cameras to create movies depicting events in a 3D world.
Rendering is the final production of finished images. It is used for both still and moving
images. There are many levels of image quality with the best images requiring the longest
rendering times.
This are the basic of Cinema 4D.

To get the entire Tutorial Download the PDF ( Click Here To Download )

Indian Brushes


This is the wonderful brush to design, easy way for sharing the brushes. it will help you a lot.

You will get lots of Indian strokes to create a new colorful design.

The brushes are very unique

To get the entire Tutorial Download the PDF ( Click Here To Download )

Flower Brushes


Fantasy is a necessary ingredient in living; it’s a way of looking at life through the wrong end of a telescope. Which is what I do, and that enables you to laugh at life’s realities. I'm exercising a little creative license here and maxing each brush size to 2500px.

To get the entire Tutorial Download the PDF ( Click Here To Download )

Star Brushes


This set of fourteen photoshop brushes, feature stars of various sizes and sparkles that can be used to add highlights to other images. I have used these sparkles on a recent design created in Photoshop. If these turn out to be popular I'll add some more to the set.


To get the entire Tutorial Download the PDF ( Click Here To Download )

Arabic Brushes


Brushes derived from Arabic script. They come in large brush size and they may be used for print quality materials. This brush set is a collections of Arabic style motif brush (with high resolution brush), made for Photoshop-CS and upper version.


To get the entire Tutorial Download the PDF ( Click Here To Download )


Monday, August 10, 2009

Unlimited Maya


Getting started with Maya Unlimited introduces the modular areas of Maya unlimited in a set
of brief lessons. The lessons are designed to let you learn these modules at your own pace.

The goal of this manual is to assist you in learning the features of Maya Unlimited.

To get the entire Tutorial Download the PDF ( Click Here To Download )

Getting Started with MAYA


MAYA provides a comprehensive suite of tools for your 3D content creation work
ranging from modeling, animation and dynamics through to painting and rendering to name.
The Maya software interface is fully customizable for those user who require the ability to maximize their productivity.
The goal of this manual is to assist you in getting started with Maya as you embark upon your learning path.

To get the entire Tutorial Download the PDF ( Click Here To Download )

Mastering Maya


Welcome to the wonderful world of Maya.I can imagine how excited you must be.
Learning Maya is a lot like learning the Japanese game of GO.
Maya Complete is an incredibly rich, full-featured 3D graphics and animation program that
encapsulates tremendous computational power.
Mastering Maya Complete is a comprehensive, practical guide to every aspect of the program.


To get the entire Tutorial Download the PDF ( Click Here To Download )
The World of Multimedia © 2008 Template by:
SkinCorner